
Building a custom website for clients or your own business often involves using a child theme. A WordPress child theme enables you to safely customize and alter the functionality of your website without changing the parent theme files. Our customers often ask us how they can white-label a WordPress child theme, so we decided to create a complete step-by-step guide that’s easy to follow.
In this article we’ll explore the process of white-labeling, why it’s beneficial and answer some of the frequently asked questions:
- What does white-labeling a WordPress child theme mean,
- Why should you white-label a WordPress child theme,
- How to white-label a WordPress child theme,
- White-labeling FAQ.
Let’s dive into it!
What Does White-Labeling a WordPress Child Theme Mean
Some articles incorrectly explain that white-labeling a child theme means removing absolutely all traces of the parent theme. This is simply untrue.
Severing all ties with the parent theme means that you will end up with a child theme that doesn’t work.
White-labeling a WordPress child theme is a process of replacing references to the original (parent) theme author, branding or any other identifying elements, in order to reflect your own or your customer’s brand.
White-labeling a child theme typically includes changing the following information:
- theme name,
- theme author,
- theme’s website URL,
- author’s website URL,
- version number,
- theme description, and
- theme’s screenshot image.
Altering these elements will make the child theme appear as a completely new theme.
Why Should You White-Label a WordPress Child Theme
White-labeling a WordPress child theme offers multiple advantages to developers, agencies, business, and sole website owners.
Let’s check out the key reasons why you should consider white-labeling a child theme:
- Establish your brand identity: replace original (parent) theme identity with your own. This creates a seamless branding experience for you or your clients.
- Provide a unique client experience: white-labeling a child theme can give the impression of a custom-built theme that’s unique to your client. When a client receives a website with a branded child theme, it feels more personalized and proprietary. This small act can increase the client’s trust in your services.
- Create a unique theme: contrary to website templates, you can build a unique theme that could be used by all travel agencies for example. You will save time because the child theme will use the main functions of the parent theme, while your additions (extra functionality, page templates) will be the cherry on top. In this way, your customers won’t need to use page builders to establish necessary pages or extra plugins for booking services, for example.
- Enhance resale potential: if you’re offering web development services, white-labeling a child theme allows you to present a more professional and polished product. Potential clients are more likely to pay for services that look and feel as an exclusive custom product.
Now that we covered the Whats and the Whys, it’s time to move on to the steps.
How to White-Label a WordPress Child Theme
Before we begin, it’s important to mention that the following step-by-step guide is based on the assumption the child theme is already installed on your website.
In order to successfully white-label a child theme, you will need either of the following tools to access your website’s directory and edit necessary files:
- FTP: you can use an FTP agent, such as FileZilla, WinSCP, Cyberduck or Transmit.
- cPanel or Hosting File Manager: through your hosting account, you can use the File Manager feature.
- WordPress plugin: plugins such as File Manager, Advanced File Manager, or File Manager Pro (it’s actually free) enable you to edit website files directly from the WordPress admin area. These plugins eliminate the need to use FTP, cPanel and other clients or services. Likewise, this option is the best choice for beginners.
Website development skill level necessary to white-label a WordPress child theme varies on the ultimate goal.
But to white-label a child theme to establish your brand identity or provide unique client experience, beginner to medium skill levels are more than enough.
For this tutorial, we’ll be using the OceanWP free WordPress theme and the official OceanWP child theme.
Since the idea of this tutorial is to be as beginner-friendly as possible, we’ll be using the File Manager WordPress plugin to access the website directory and white-label our child theme files.
Be advised, ensure the child theme is disabled and inactive while you perform these changes.
Step 1: Rename the Child Theme Folder
Renaming the WordPress child theme folder is not as eye-striking and into-your-face change.
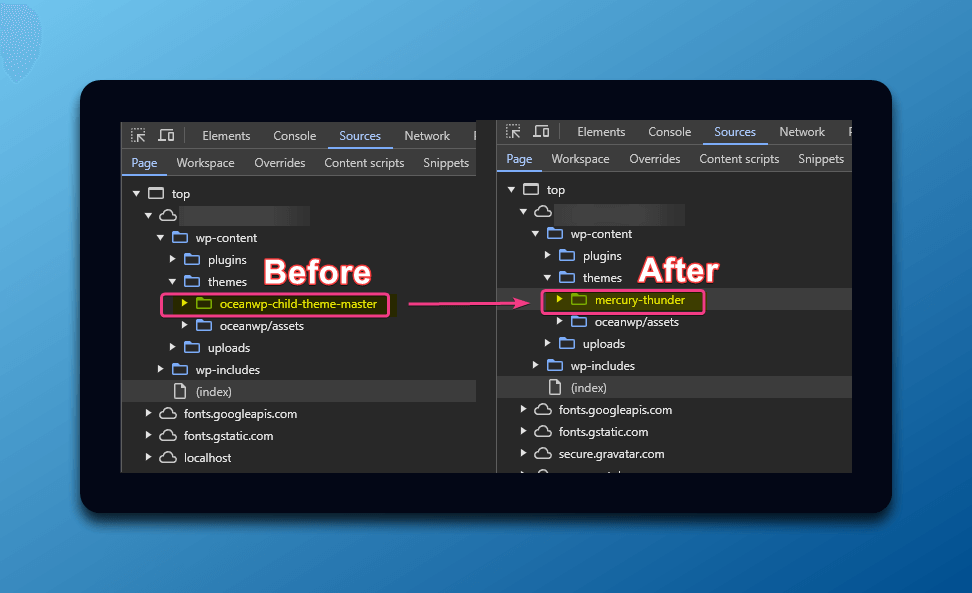
However, this information will be visible to anyone checking out your website code and sources externally, by using tools such as the Browser Inspector.
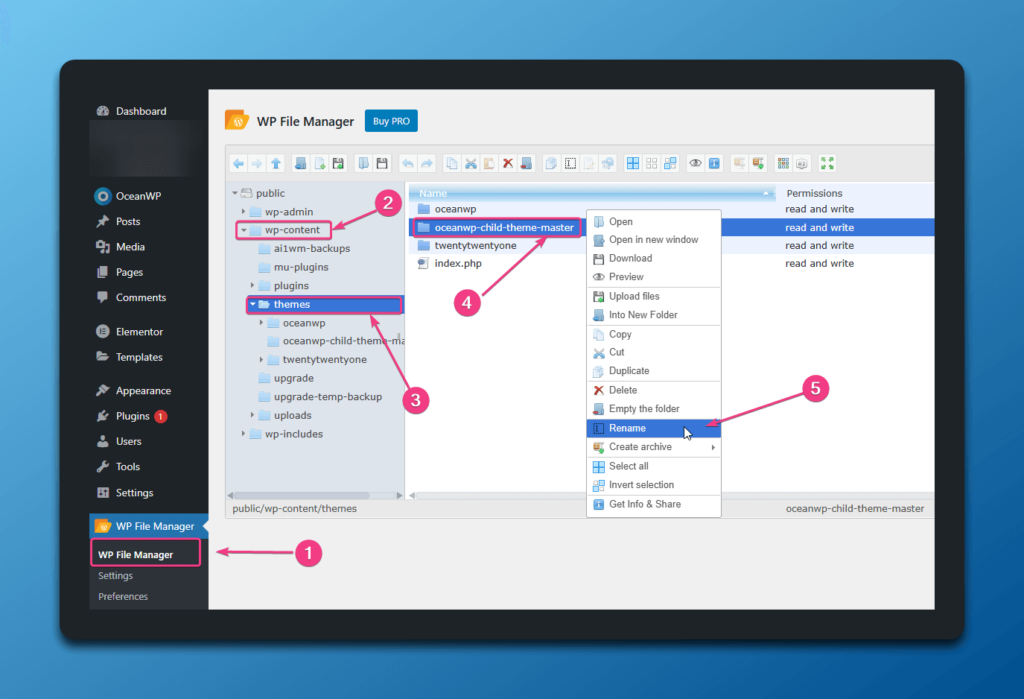
To rename the child theme folder, you need to:
- Access your website’s admin area,
- Go to WP File Manager option in the admin sidebar,
- Navigate to the
wp-content/themesfolder, - Right-click the child theme folder and choose the option Rename,
- Replace the original folder name with the name you want: must be in lowercase, one word or multiple words separated by dashes ( – ). Do not use space or any other special characters:
- Correct child theme folder name examples:
- mychildtheme
- my-child-theme
- Incorrect child theme folder name example (therefore, avoid):
- my child theme
- Correct child theme folder name examples:
- Hit Enter on your keyboard and wait a few seconds for the changes to be applied.
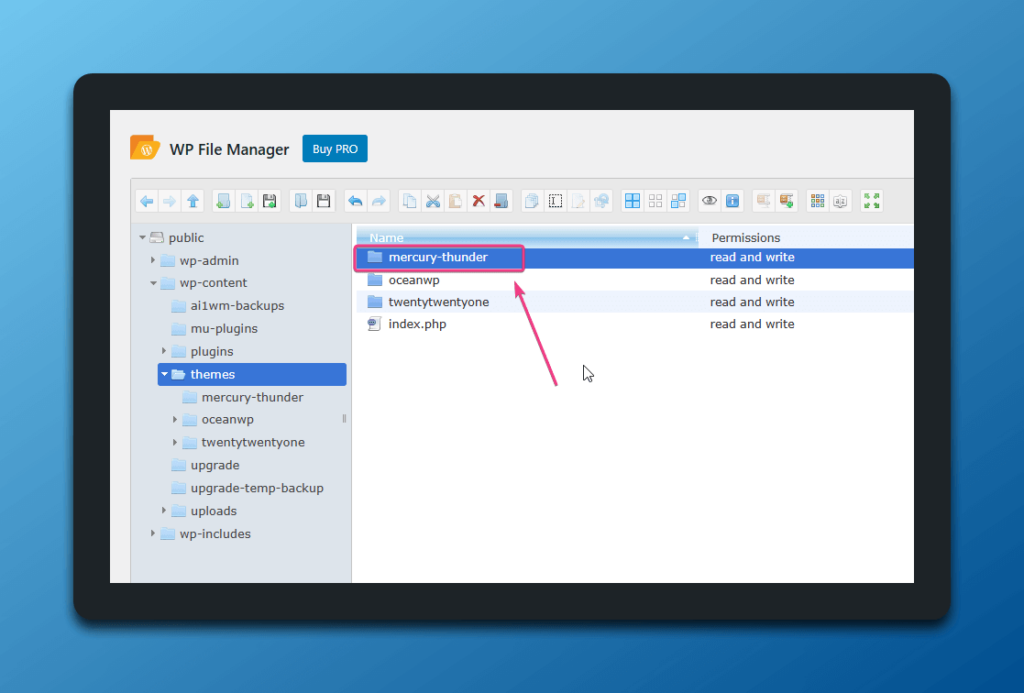
Now, when you check out your website’s source information, you will see that changes are applied. Now it appears as you’re using a fully custom child theme.
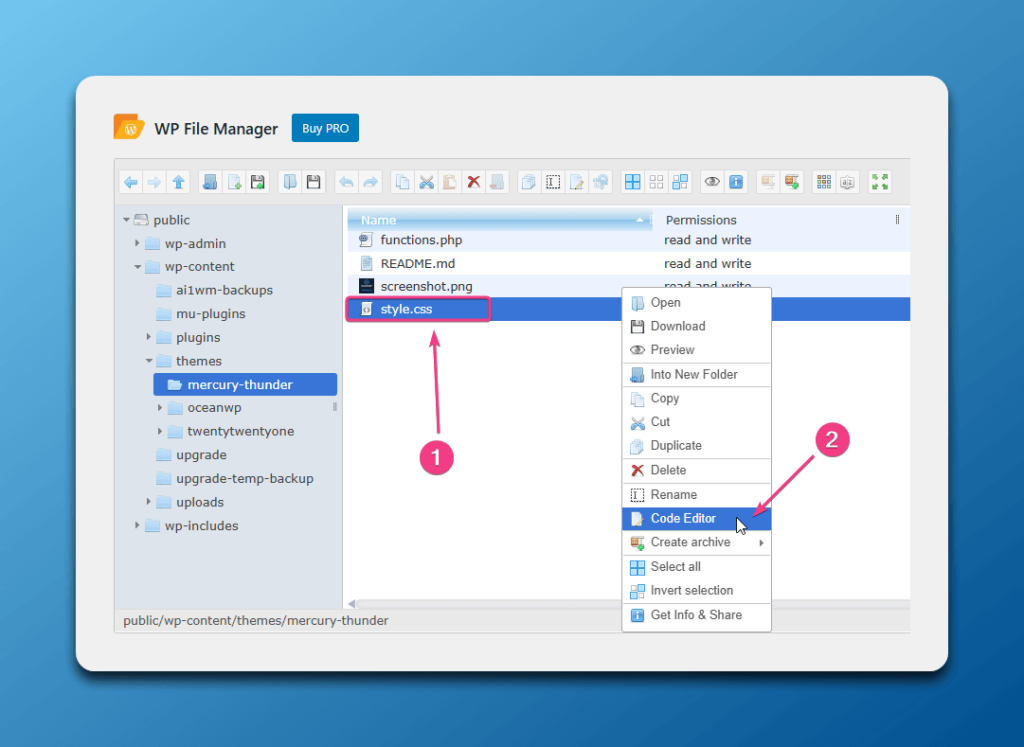
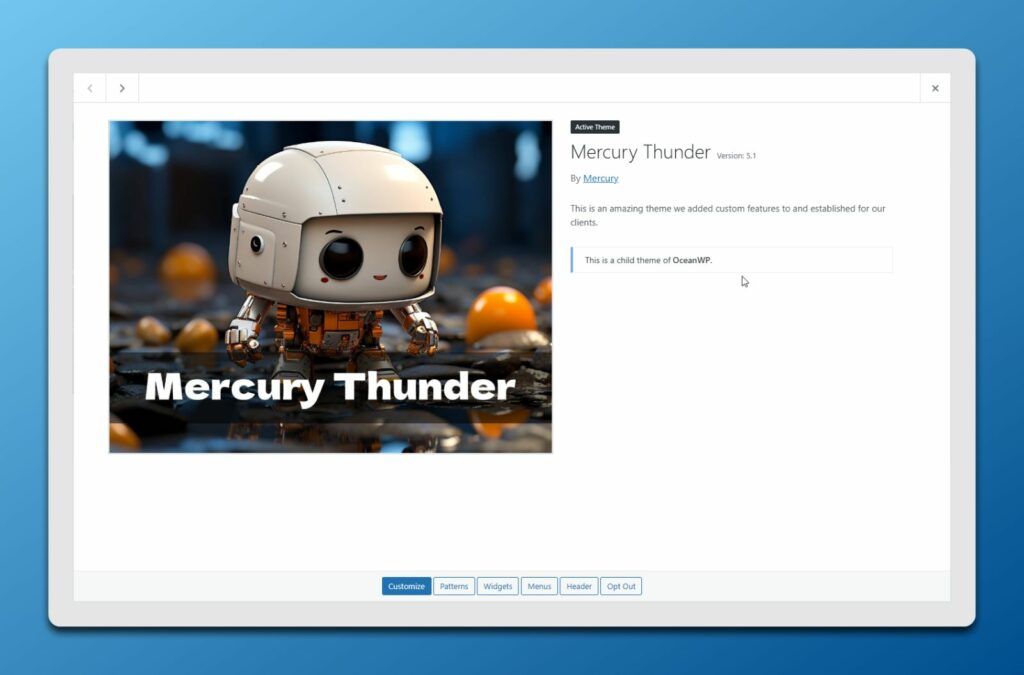
Step 2: Modify the Child Theme Information
Child theme information is the info displayed in the WordPress Themes area (Appearance > Themes).
This information includes the theme’s name, theme author, version number and more.
To modify a WordPress child theme information and replace it with your own brand identity, you need to modify the child theme’s style.css file:
- Using the File Manager plugin, double-click the child theme’s folder to access its individual files,
- Right-click on the
style.cssfile, and use the Code Editor option to edit information.
The following child theme information is safe to edit:
- Theme Name: replace original child theme name with a name for your custom child theme.
- Theme URI: replace the original child theme URL with your website’s URL.
- Description: replace original child theme description with a description of your own.
- Author: replace the original child theme author name with your own.
- Author URI: replace the original child theme author URL with your website’s URL. Preferably, add a link to your About page.
- Version: replace the original child theme version with that of your own.
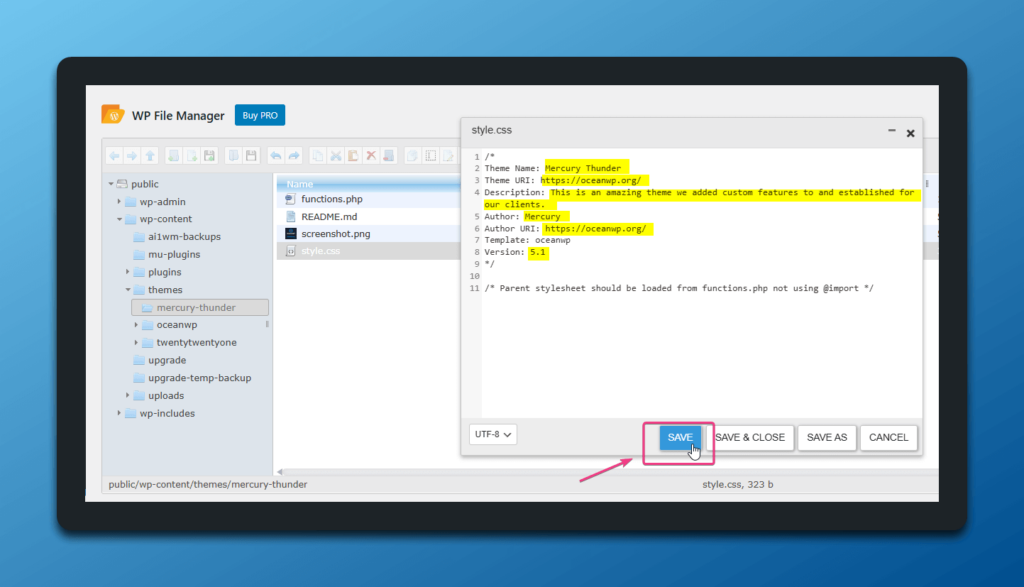
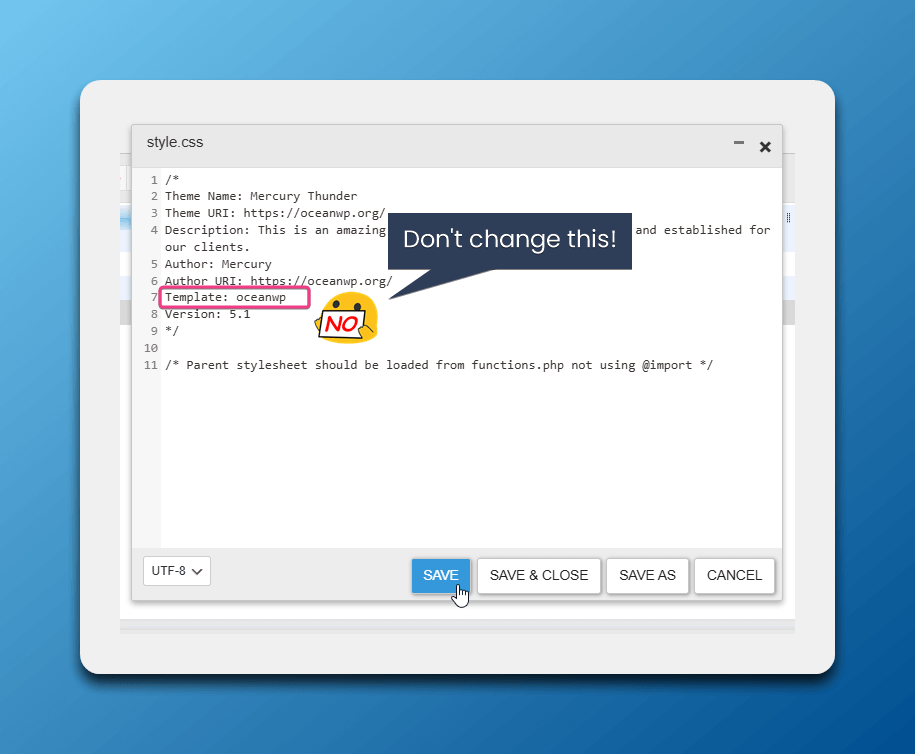
The one thing that you must not change is the Template information, otherwise your child theme will become useless and unfunctional.
Once you’re done with the changes, click the Save button and exit the Code Editor.
Now it’s time to replace the child theme’s screenshot.
Step 3: Replace the Child Theme Screenshot Image
Theme’s screenshot image is just as important as the textual information.
Humans are visual creatures, and rely heavily on visual cues, so the theme’s screenshot image will be the first to get anyone’s attention. Especially the attention of your client.
Your theme’s screenshot image can be any image, as long as it adheres to specific guidelines:
- File type: PNG or JPG.
- Size: 1200px width, 900px height.
- File name: screenshot.
You can use online image editing tools to edit, crop and polish up your screenshot image, such as Canva, Photopea, or Freepik.
Also, you can use TinyPNG to compress the finished image without losing quality.
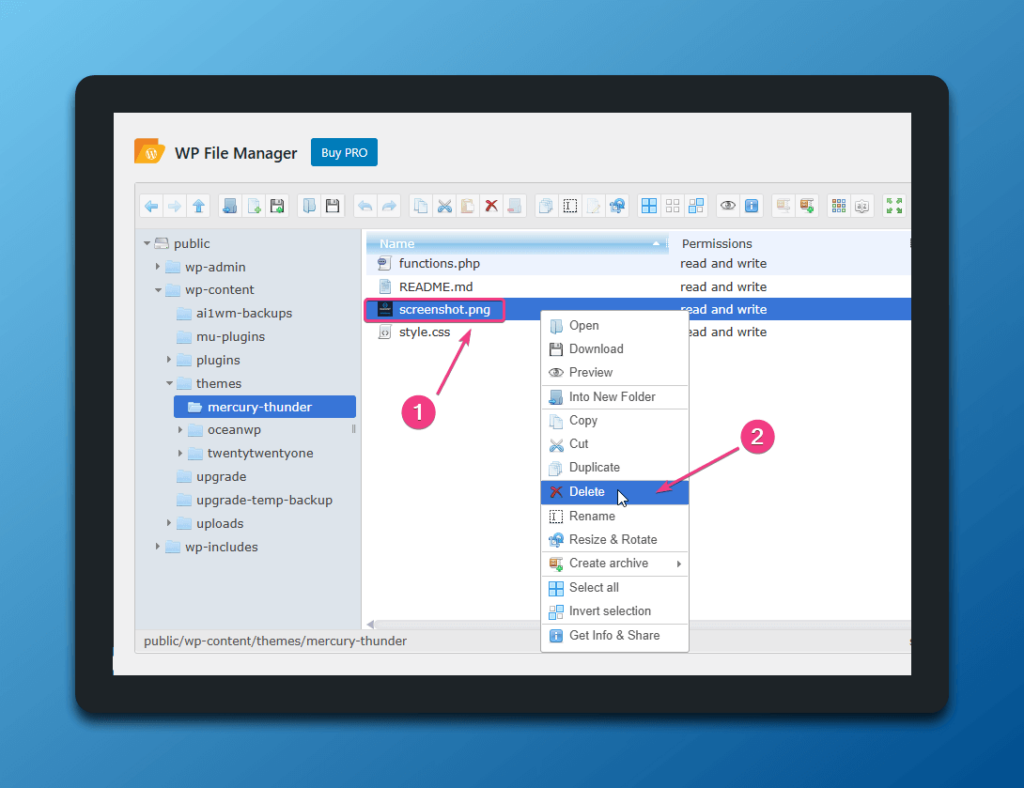
When our screenshot image is ready, we can now proceed and replace the original child theme screenshot image:
- Using File Manager, right-click on the default screenshot image file, and select the option Delete, to remove the image.
- Confirm you want to remove the file permanently.
- Right-click anywhere in the child theme’s folder empty space, and select the option Upload Files.
- Select your new theme screenshot image file and upload.
- Wait a few seconds for the file to be uploaded and processed, and that’s it.
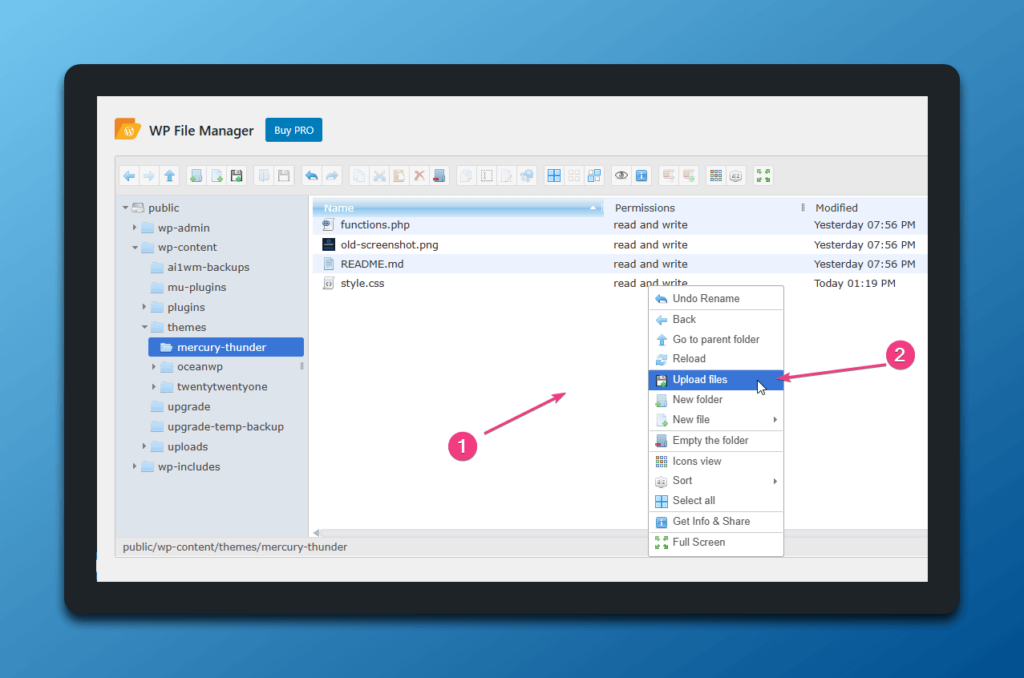
Hint: instead of removing the old (default) screenshot, you can also simply rename it to something else, like old-screenshot (yes, we know, quite creative).
Ok, people, you’re done!
You have successfully white-labeled a WordPress child theme in 3 simple steps.
Now navigate to Appearance > Themes, and take a moment to admire your creation.
Activate the child theme, then proceed to do whatever you intended to do.

You can also remove the File Manager plugin from your website, if you feel you won’t have any use for it in the near future.
White-Labeling WordPress Child Themes: FAQ
Q1: Is it Safe to White-Label a WordPress Child Theme?
A1: Yes, it’s completely safe to white-label a WordPress child theme. White-labeling doesn’t affect your website’s functionality or performance.
Q2: Does White-Labeling a Child Theme Affect Theme Updates?
A2: No, white-labeling a WordPress child theme doesn’t affect the parent theme updates in any way.
Q3: Can I White-Label Any WordPress Child Theme?
A3: Using the white-labeling method we described in this tutorial, in practice you should be able to white-label absolutely any WordPress child theme without any [legal] issues.
But if you’re using a parent theme that’s not hosted on wordpress.org, i.e. it’s entirely premium, it’s best to confirm things with the theme author.
Q4: Does White-Labeling a WordPress Child Theme Make the Theme My Own?
A4: White-labeling a child theme using the method outlined above does not make a theme your own in its true sense. White-labeling simply changes the theme’s appearance and information displayed in the WordPress backend.
Q5: Can I Sell White-Labeled Child Themes?
A5: If you’re building unique custom child themes that contain special functionality, it’s only natural to white-label such WordPress child themes.
In practice, you should be able to sell unique custom white-labeled child themes, as long as you have proper rights to distribute the parent theme, as well as ensure to give credit where credit is due.
However, to avoid any issues or potential conflict, it’s best to clear things up with the parent theme author.
Final Thoughts
White-labeling a WordPress child theme is an excellent way to provide personalized, branded experience for your own business or for your clients.
It’s also lots of fun.
By following the steps outlined above, you can quickly white-label a WordPress child theme, even if you’re a complete beginner.


it’s not really white-labeled, as anyone with sufficient knowledge (based on the info given here) could open the style.css file and read “oceanwp”.
With child themes things are different 🙂 if anyone adds any custom codes of their own to the child theme, they should definitely white-label it in order to put their mark on the work they did. ‘oceanwp’ in case of our theme (or any other theme, except the template name changes) ensures the child theme is pulling info from its parent theme. If that info is altered, the child theme on its own becomes useless – no juice to load and use. White-labeling parent themes is something else entirely