A real estate website needs to be as stable and as reliable as the houses you are selling.
But building a sturdy real estate website that users will enjoy using can sometimes be as difficult as building the houses you are selling – if you use the wrong set of tools.
Luckily, combining Toolset Real Estate with OceanWP is proven to give you a professional real estate website with all of the functions you could possibly need.
In this guide, we will show you how to build the following features:
- Custom post types for your different properties and agents
- Custom fields to add information such as the number of bathrooms
- Taxonomies to separate your properties based on features (detached houses, bungalows, etc.)
- Templates to display your properties with the same structure
- A slider to show images of your properties
- Post-relationships to link the estate agents with the properties they are in charge of
- A search so users can easily find the best property for them
- Maps to show the locations of the properties and search results
- A front-end form so users can submit their own property listings
If you want to carry out these steps as you read them, you can use your own free test real estate website built by Toolset and OceanWP.
Why we’re using Toolset Real Estate and OceanWP
Toolset Real Estate is part of Toolset which provides you with all of the features you need to build multiple types of professional websites.
Specifically, with Toolset Real Estate you won’t need any other plugin to add the features a real estate website needs. This means you don’t need to worry about plugin compatibility or whether the sheer number of plugins will slow down your website.
Meanwhile, OceanWP is one of the most popular themes for business websites for a reason. Websites run by OceanWP have a better conversion rate, faster load times, and improved SEO – so house buyers can find your website easily.
Together, Toolset Real Estate and OceanWP work seamlessly together which means you can build robust websites that look great without any concerns.
Don’t forget, you can download test websites built using Toolset and OceanWP for free to experiment on.
What you’ll need to get started
When you build a custom real estate site with Toolset, you’ll need the following Toolset plugins:
- Toolset Types – for setting up custom post types, fields and taxonomies, for the properties and agents
- Toolset Blocks – for designing your site’s front-end (templates and searches for properties, etc.)
- Toolset Maps – for adding features that enable searching for and displaying properties on maps
- Toolset Forms – for allowing agents to manage properties through custom front-end forms
- Toolset Access – for controlling what parts of the site visitors, clients and agents can access
Once you’ve installed and registered these components, it’s time to get started on building your real estate website!
1. Create your custom post type
First, we need to create a custom post type for our “Houses” section so that users know exactly where to go to view them.
1. Head to the Toolset → Dashboard in your WordPress admin and click on Add new post type.
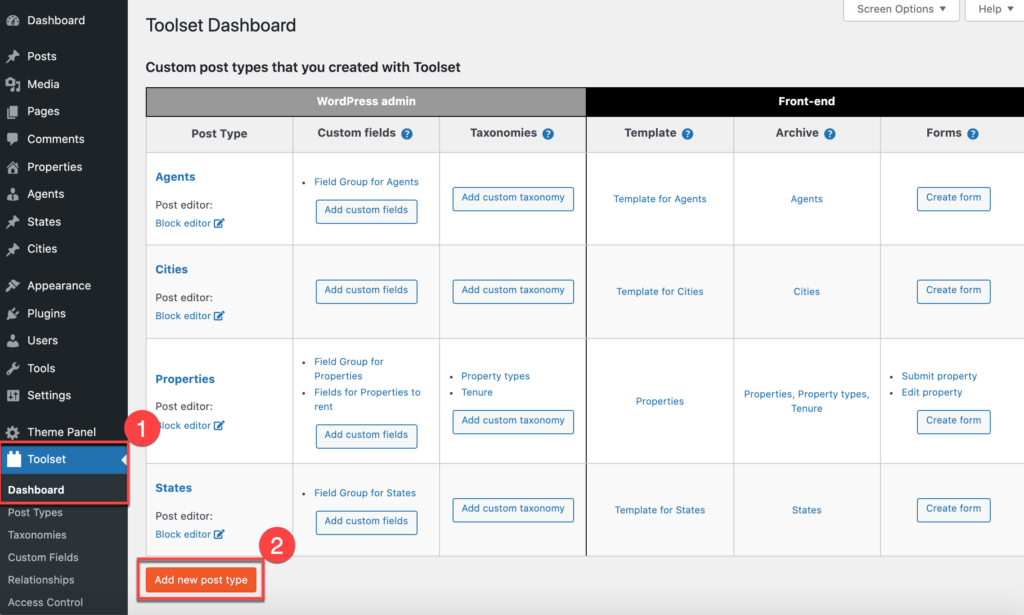
2. We now need to name our post type and save it to the position we want it to be displayed in the admin menu.
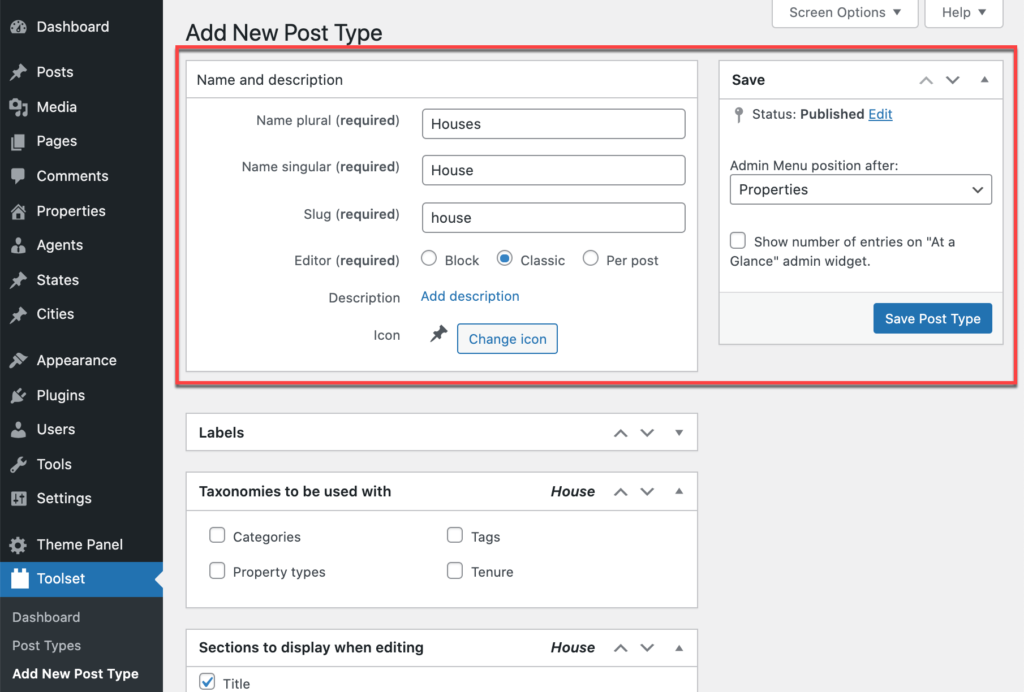
3. Click Save post type.
And that’s it. Your houses custom post type is ready.
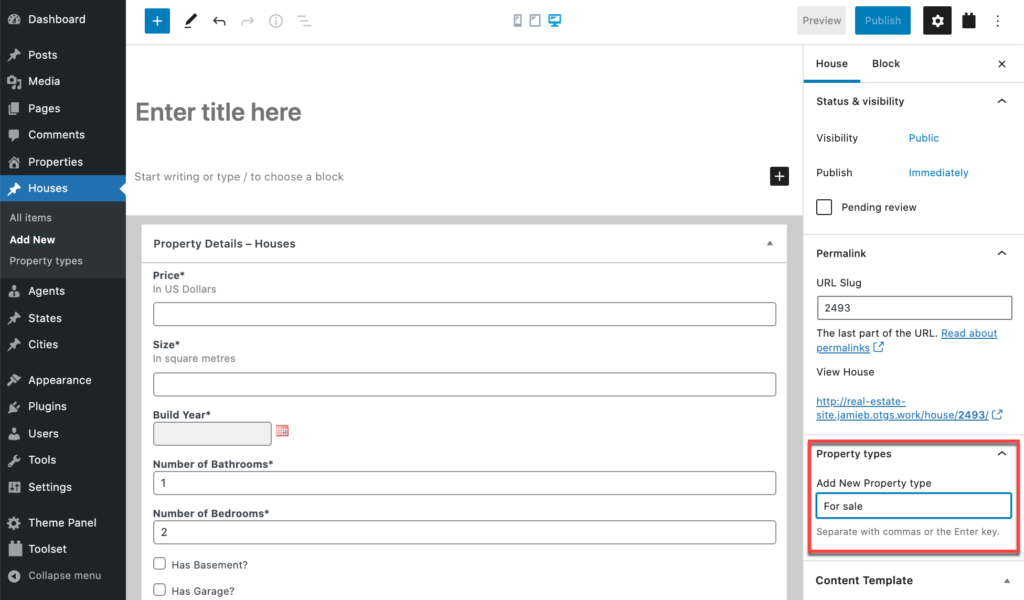
2. Create your custom fields
Now that we have our custom post type, we need to add some custom fields. Our custom fields make up a template of sections which we’ll want to fill in to describe each house and its features.
For example, we’ll need sections for the number of bathrooms, price, and year the property was built.
- On the Toolset Dashboard, click on Add custom fields next to the “Houses” custom post type which we created.
2. An Add New Field box will pop up where we can choose which type of custom fields we want. For example, a custom field for “Build year” will be a number.

3. For each field you will need to set options such as whether it is compulsory to enter information.
4. Once you’ve filled in all the preferred options for a field, click on Add New Field to move on to the next one in the group. Once you’ve added all fields for a field group, click on Save Field Group.
Now, each time you edit a “House” post you will see these fields to fill in.

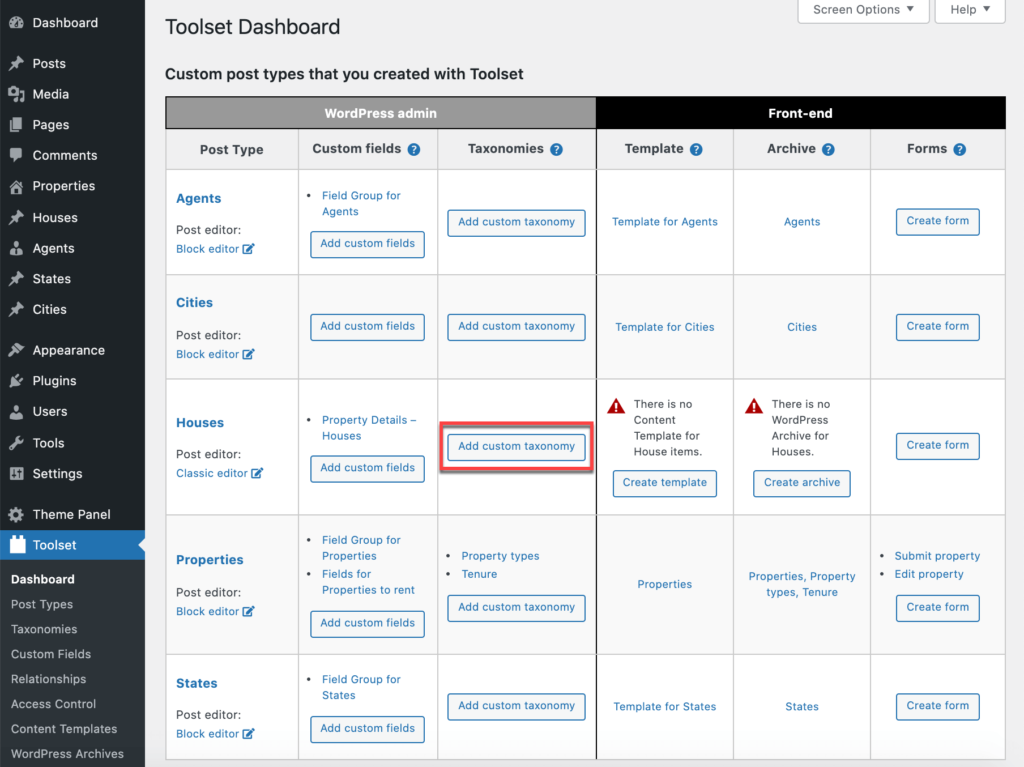
3. Create your custom taxonomies
Custom taxonomies are a great way to separate properties so that users can easily find the ones that match their criteria. For example, if they only want to see houses that are for sale rather than to rent.
Taking that example, here’s how to create taxonomies to differentiate between houses that are for sale and houses for rent.
- On the Toolset Dashboard click Add custom taxonomy in the Houses row.
- Enter the following in the boxes
- Name plural: Property types
- Name singular: Property feature
- Slug: Property Feature
- Choose whether you want the taxonomy to be hierarchical or flat. For the purpose of this one, we will keep it flat.
- Select which post type you want the taxonomy to be associated with – in this case, it will be “Houses.”
- Click Save taxonomy
Now, when we edit or create a “Houses” post type, we can create and select “Property type” taxonomies to attribute to the post type.
4. Create a template to display the properties
We now have the core components we need to show off our properties but an important part of the process remains – how do we display them on the front-end?
This is where we create a template that we can use to display each one of our houses.
To build our template for single “Houses” we will use Toolset Blocks with the WordPress Block Editor.
With Toolset Blocks, you can design templates for your custom post types, with custom fields and taxonomies. No HTML, no CSS, no JavaScript, and no PHP needed!
- Go to Toolset → Dashboard and click the Create Content Template button in the Houses row.
- Use the WordPress Block Editor to design your template.
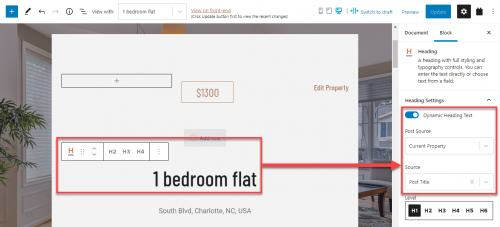
- Choose blocks from the Toolset section for any part of the template that displays fields (not static elements). For example, use Toolset’s Heading block for any heading that will display a field. Toolset adds the option to display dynamic content also from the WordPress core and most popular 3rd-party plugins.
- Enable Dynamic Sources for blocks that should display fields of the post that the template displays.
You can modify and style your template in many ways. For example, you can arrange content in columns, display parts of the template conditionally, display a list of related posts, and much more.
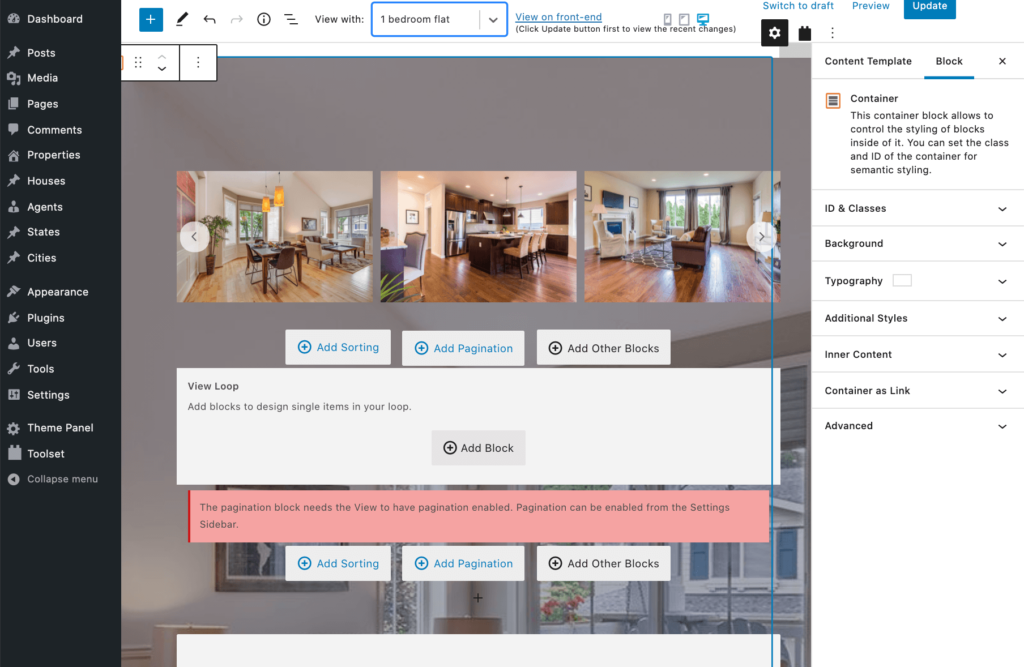
5. Create a dynamic slider to feature your property images
A slider is a great way to showcase your properties by displaying multiple images of each one.
Using Toolset, you can easily create complex sliders featuring transitions without any complex PHP coding.
- Once you’ve edited or created a page, post, or template, insert the View block and create a new View.
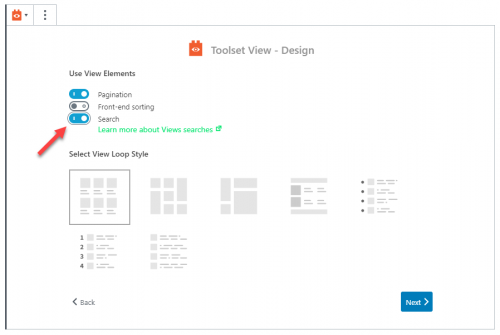
- In the View-creation wizard, enable pagination and in the Select View Loop Style section, choose the Unformatted (last) option.
- In the last step, select the post type for which you want to display posts.
- Click to finish the wizard and your View is ready.
Displaying post fields and apply custom styling
- Insert a Container block so that you can add a background to your slider. For example, you can set the slide’s background to be a dynamic image coming from the post’s featured image.
- Use Toolset blocks to add other dynamic fields to your slider, like the post title.
With Toolset Sliders, besides displaying post fields and applying custom styling, you can tweak your slider with an array of other options, such as making your View slide automatically and changing the pagination style.
6. Create a post-relationship to connect your houses with your agents
Post relationships are an important yet underrated part of any website. With post relationships, you can connect different types of content with one another.
To find out more about how they help you check out our guide to creating post relationships using Toolset and OceanWP.
On our real estate website, we have houses and estate agents. Let’s create a post relationship between them.
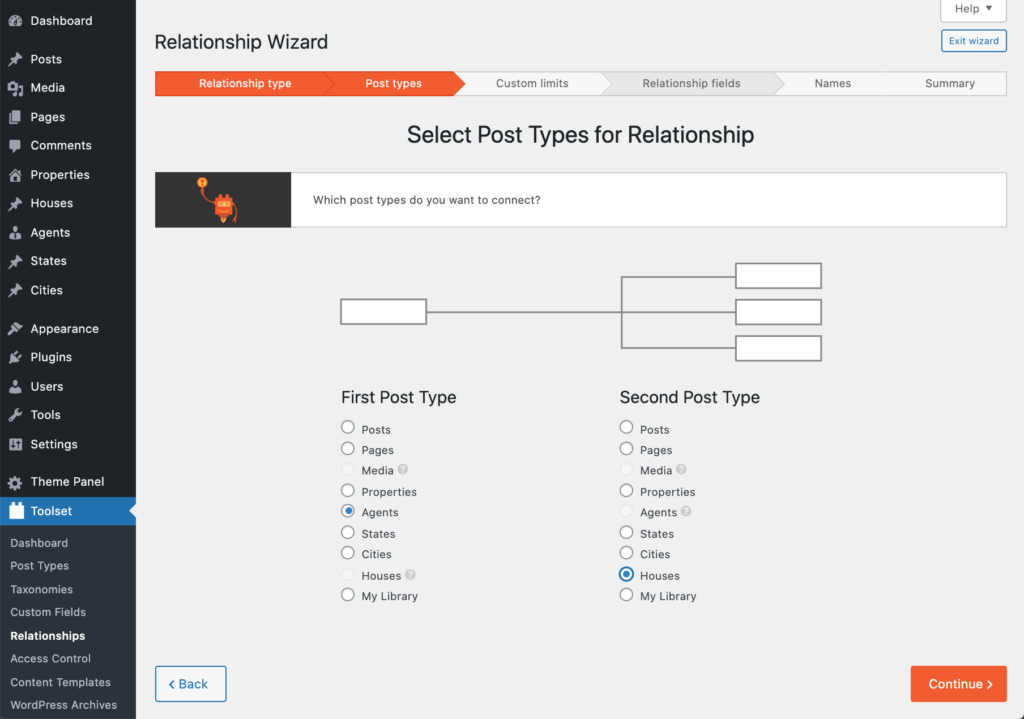
Create the post relationship
- Go to Toolset → Relationships and click Add New at the top.
- The Toolset relationships wizard opens up. For our agents and properties, we want a “one-to-many relationship” as one agent will be in charge of multiple properties.
- Select the post types that will form the relationship.
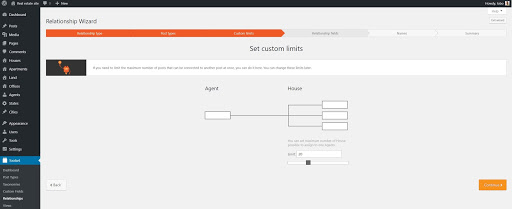
4. Select if you want to limit the number of posts you can assign. For example, you might want each agent to only have a maximum of 20 houses assigned to them.
5. Name your relationship.
6. Review your relationships and click Finish.
How to assign properties to an agent
Now we can start creating specific connections between our properties and estate agents.
- Navigate to an agent’s page from the admin menu
- A new section will have appeared at the bottom of the page called Agent Property. Click Connect existing Property and then type to find the name of a property or select it from the available list.
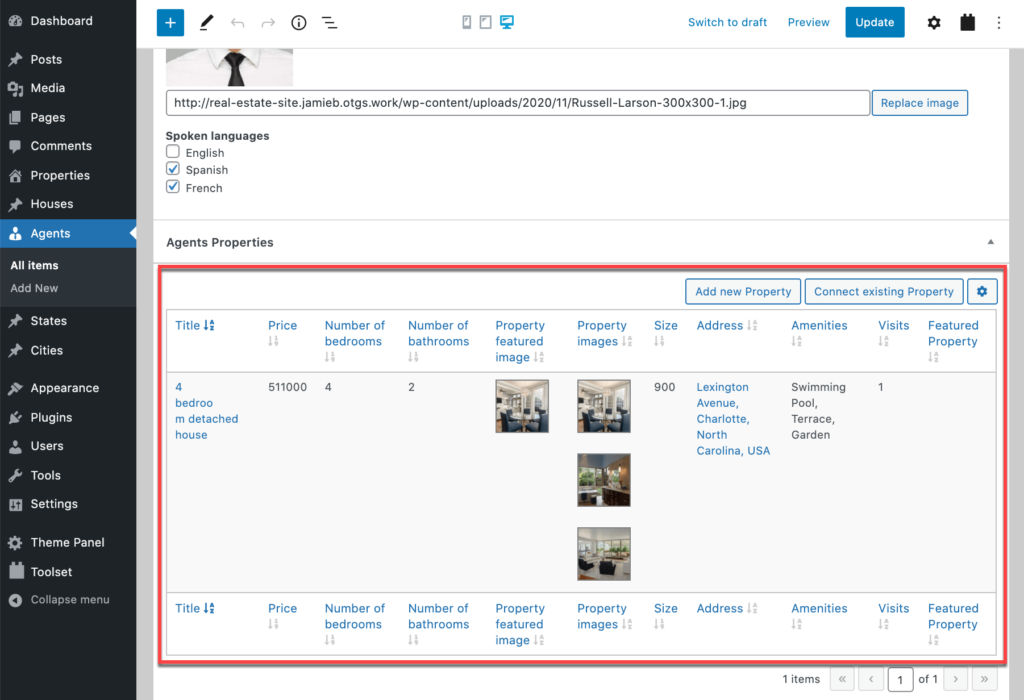
3. Click Update to save your post. Now, when you visit the agent’s page, any properties you’ve connected to them will be listed. Also, if you edit one of these properties’ pages, you will see that the relationship has been displayed at both ends – the agent will be listed on the property’s page too.
Creating a View to Display Your Post Relationship
There are two ways to display your list of post relationships:
- Display a list of the “many” related posts in one-to-many and many-to-many relationships.
- In one-to-many relationships, display fields that belong to the “one” side.
Displaying many related items
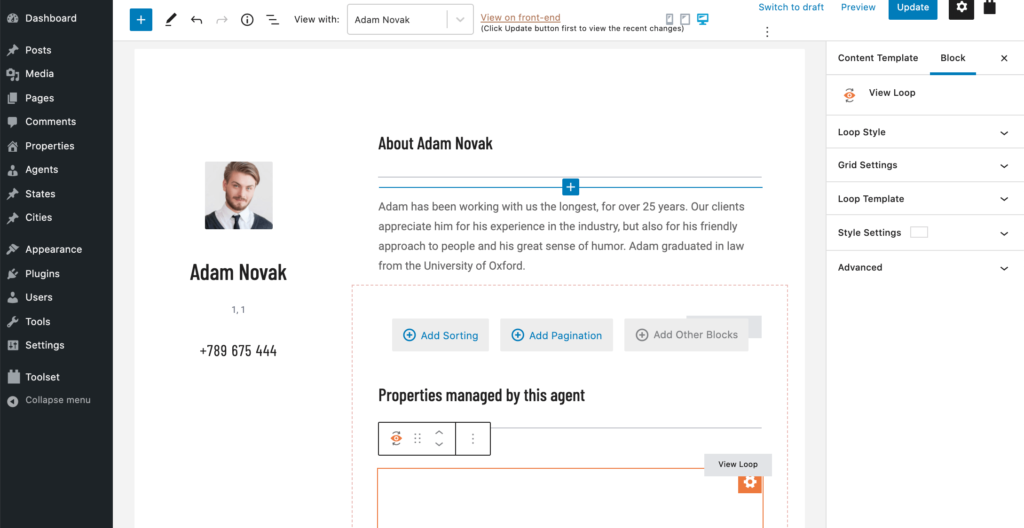
In our example, agents have many properties, so we’ll use a View to display them.
- Navigate to your “Agents” Content Template
- Insert a View block and create a new View
- Select to display the post type you need (ie, properties) and then select the option to display Properties that belong to the current Agent.
- Use blocks to design the output for your View. Because the View is already set to display related posts, you don’t need to select the relationship in blocks you use to display dynamic content.
Displaying one related item (parent)
- Navigate to your “Properties” Content Template.
- You can use any Toolset block to display parent information.
- In the block properties, select the parent from Post Source.
- Select the field you would like to display.
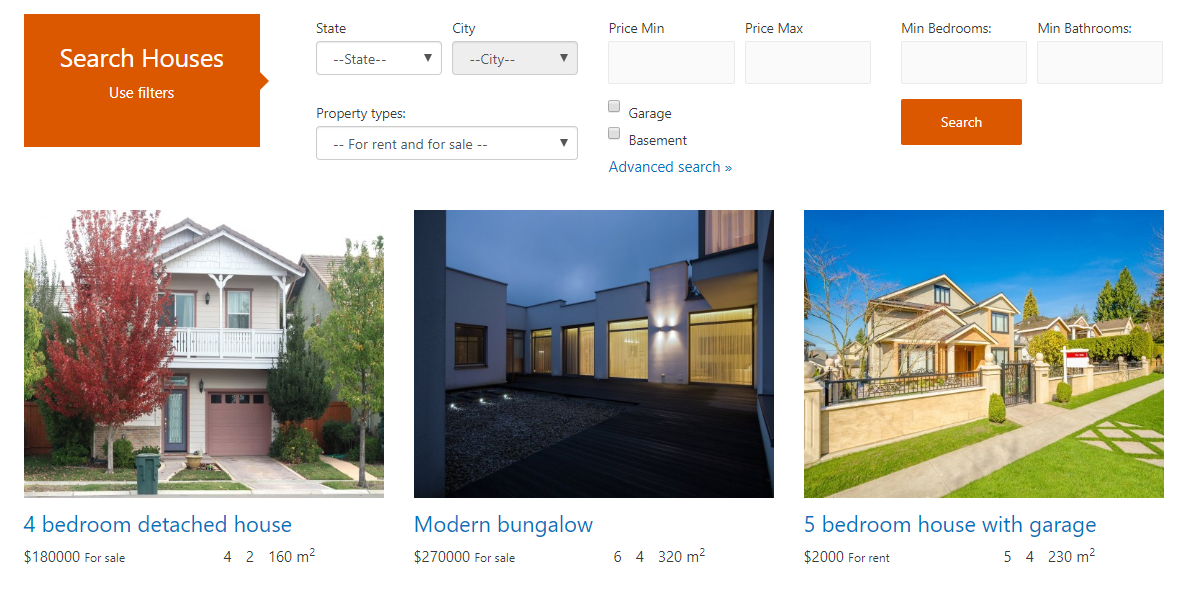
7. How to add an advanced search so users can easily find their best-matched properties
An advanced custom search is the best way for your users to find exactly what they are looking for. With multiple filters, they will be able to select the best house based on their personal requirements.
- Start by inserting a View block into a page.
- In the View creation wizard, enable the Search option.
3. On the next page, select “Properties” under Choose content this View will display.
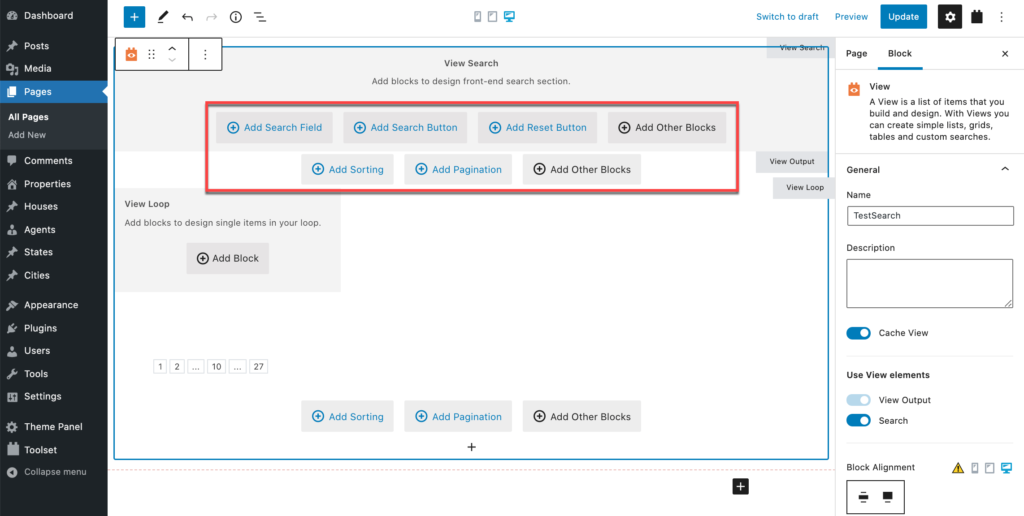
4. After finishing the View creation wizard there is a View Search section in the View’s editing area. Use the available buttons to add a custom search field, insert submit and reset buttons, or add other blocks.
For example, you can click to Add Search Field and use the Select a Field dropdown. Select which content type you want users to be able to search by and click Next.

5. You can now use the right sidebar to tweak the options for this search field. This includes the main field settings, label and style options.
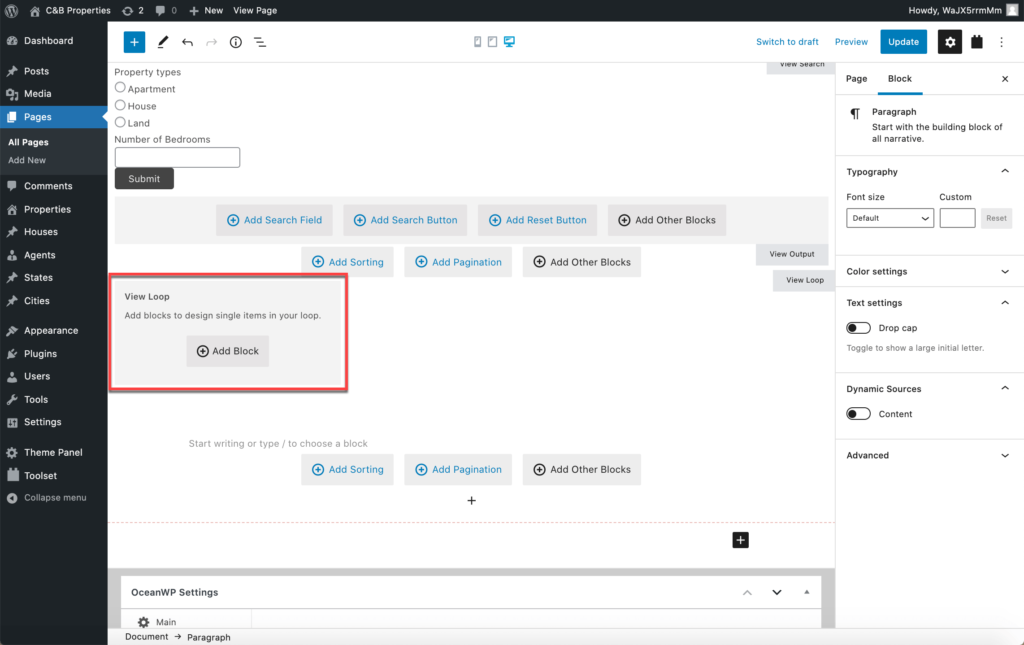
6. Now we’re ready to create the section where the results will be displayed. We do this by adding blocks in the View Loop area of the editor.
7. Click Add Block.
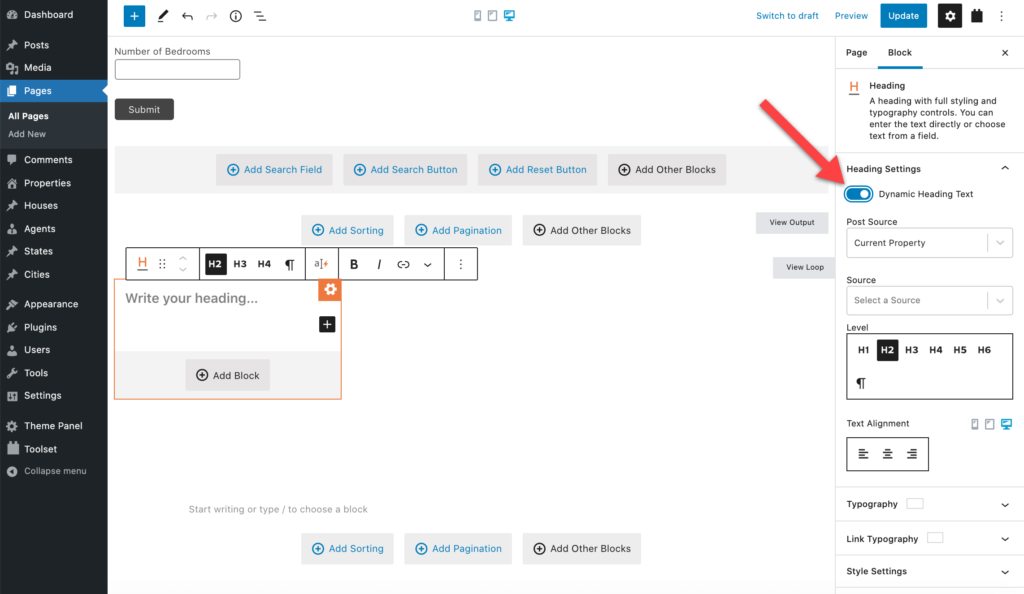
8. Choose a block that you want to use as part of your search results. For example, you could use the Heading block to display property titles in the search results.
Remember to use the orange Toolset Blocks, which will enable you to use dynamic sources for the fields
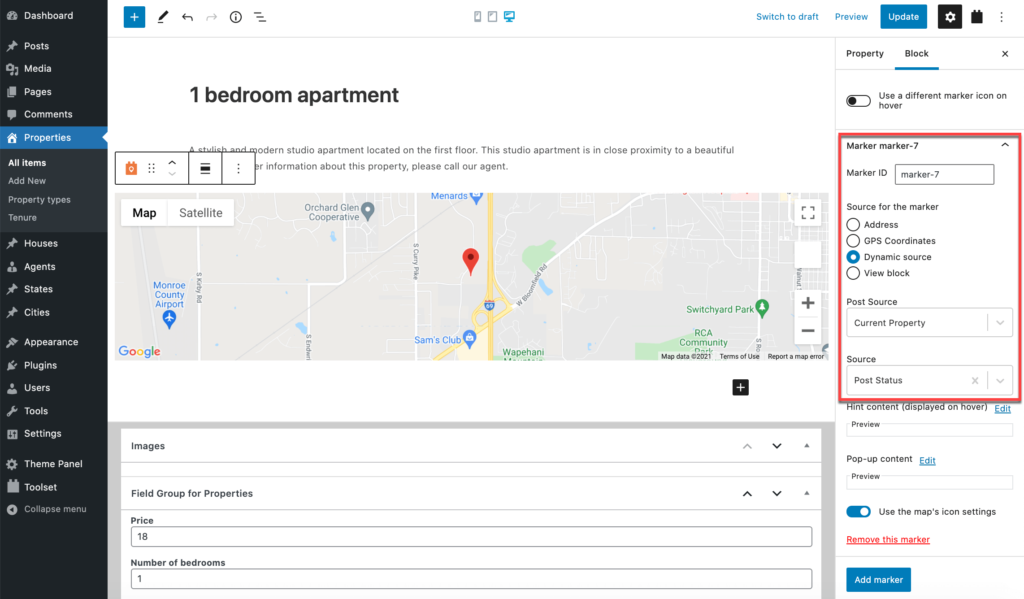
8. Display maps to show the locations of properties
Maps are a great way of helping users immediately understand the exact location of a property.
- To start creating a map, navigate to the page or template where you want to display the map. Insert the Toolset Map block. If you need to set an API key, Google provides detailed instructions on how to do so.
- In the Source for the marker section enable Dynamic Source.
- In the Post Source dropdown select “Current Property”. Then, in the Source dropdown, select any custom field that contains an address to show it on the map
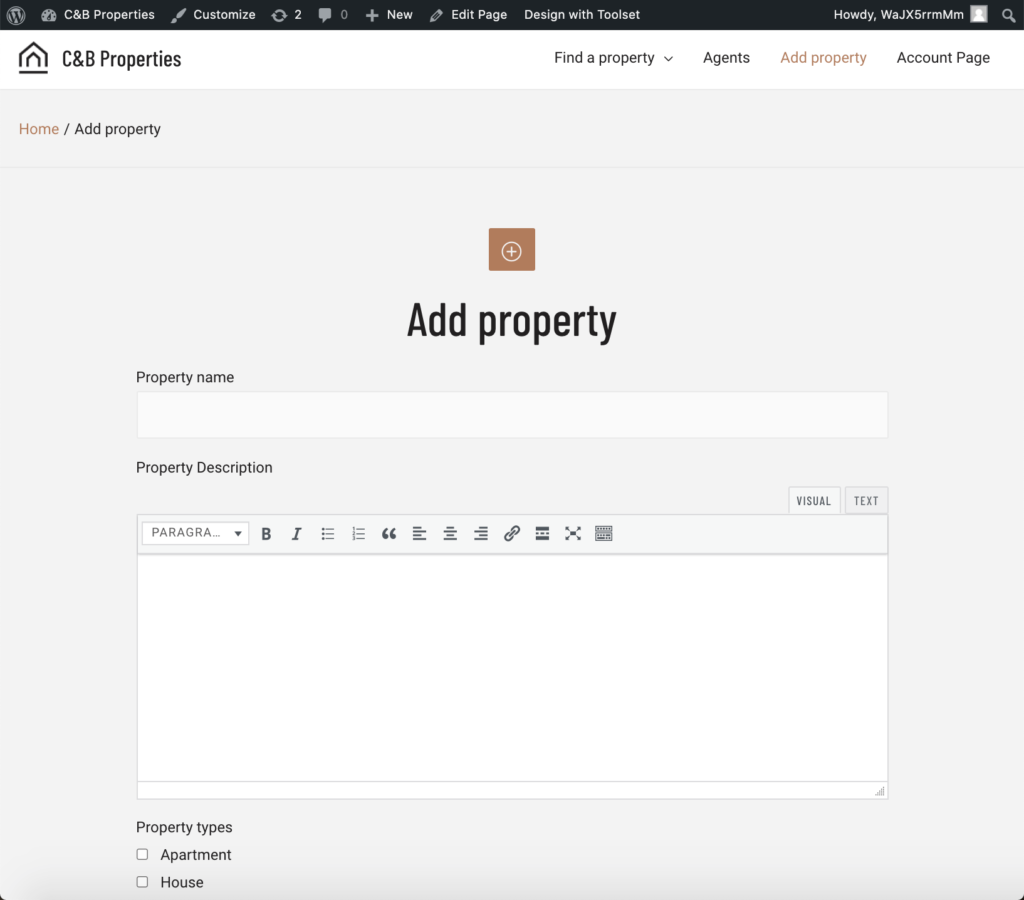
9. Build a front-end form for users to submit their own content
Finally, you may want users to provide their own listings to advertise on your real estate website. One of the easiest ways to do this is through a form on the front-end that features all of the fields you’ll want them to fill out.
Creating the form couldn’t be simpler thanks to Toolset’s drag-and-drop editor.
- Go to Toolset → Post Forms and click Add New.
- Click Continue in the Forms wizard and enter the name for your form.
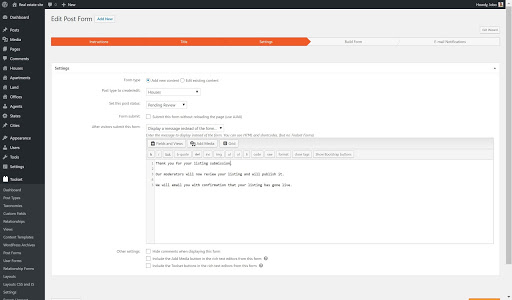
- Edit the settings for your form including:
- The post type they will add submissions to
- The status of the post once it’s submitted
- What users see after they submit the form (you can also add a message as I have done below)
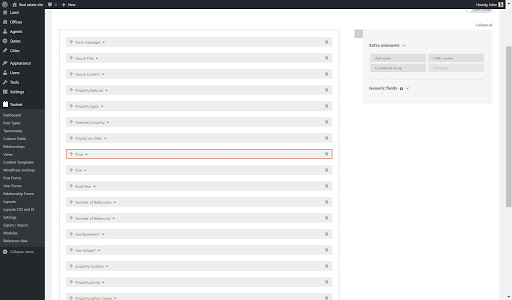
4. Now you reach the drag-and-drop editor where you can decide what fields go and where. Here you can also use the CSS Editor and JS Editor fields to style your form. There are also a number of extra elements which you can add.
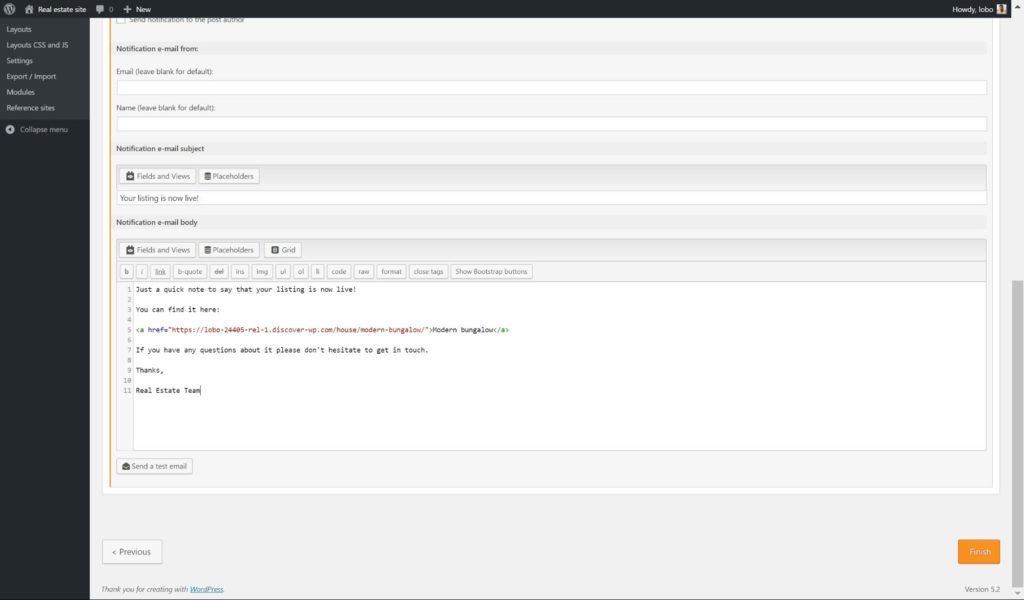
5. On the next page you can add any email notifications that you want users or editors to receive at any stage. Below I added an email to send to users when their listing goes live.
6. Click Finish and your form is now ready to be displayed.
7. All you need to do to display the form is go to the page you want the form added to, add the Toolset Form block, and select the form you’ve just created for the dropdown list.
Next steps
Once you’ve worked through these nine key steps for building your own real estate website, you can make your site even more impressive by taking Toolset’s real estate online course.
The easy-to-understand modules make up a comprehensive step-by-step guide – full of handy videos – that tells you everything you need to know to build a remarkable real estate website.
What has your experience been of building a real estate website? Let us know in the comments!
![OceanWP is Lightning Fast on Cloudways [Stats Inside]](jpg/cloudways-oceanwp-768x384.jpg)


Hey,
Wow, this is interesting option for building a real estate agency’s website. I was already consulting coders for this task, but now I will consider building it myself with OceanWP & Toolset. Great news, waiting for client to start the project 🙂
Thanks for sharing this amazing post.
That’s very nice of you, recently I am searching for someone to build me a website like this but now I can make my website
Very nice informative content. I found very interesting while reading this article. Very detailed explanation about real estate website. Thanks for sharing this.